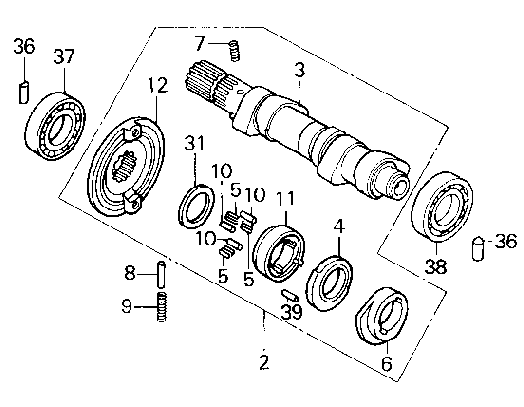
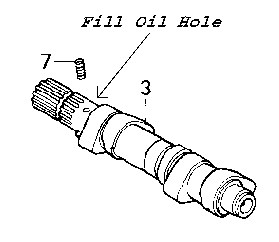
A look at the '88 and onwards XR600 camshaft assembly.

Diagram No Part Description Honda Part No.
2 Entire Camshaft Assembly 14000-MN9-020
3 Camshaft 14100-MN9-020
4 *Cam, Reverse 14102-MN1-670
5 *Spring, Roller 14103-MN1-670
6 *Plate 14105-MK4-862
7 *Spring, Decomp 14106-MN1-670
8 *Plunger, Cam Setting 14108-MN1-670
9 *Spring, Plunger 14109-MN1-670
10 *Roller (4X10) 14115-MN1-670
11 *Clutch Outer,Decomp 14121-MN1-670
12 Collar, Cam Sprocket 14325-MN1-670
31 *Washer (17X22X0.75) 90401-MN1-670
36 Pin, Dowel (10X20) 90702-MN1-670
37 **Bearing (18X37X9) 91002-MN1-671
38 ***Bearing (6904) 91003-KF0-008
39 *Roller (4X10) 96220-40100
 

* = Part of Auto Decomp Assembly
** = Specially ground Inner Diameter Honda Bearing
*** = This bearing can be sourced cheaper from bearing manufacturers rather than honda O.E.M.


Removal of Auto Decomp.

Necessary Disclaimer.
This procedure is merely a description of how I go about removing the Automatic Decompressor system from bikes that I have personally owned, and other thoughts, also other thoughts on the matter I've had based on other peoples experiences and advice.  I personally preferred these bikes without the Device.  I take no responsibility for anyone else implementing this information as it is only a record of my experience related to the matter.

Note:
It is also possible to shortcut this procedure by grinding the lug off the right hand exhaust rocker.  This leaves the mechanism on the cam but is a somewhat simpler method and allows for easy reversal (by purchasing a new rocker).  Personally I like the whole lot gone but many people favour this method.  As a slight twist to this I have also heard of people grinding the actual decompressor camlobe off.  I haven't tried either of these methods however.


STEP ONE.

Remove Camshaft (follow Shop Manual for this procedure)

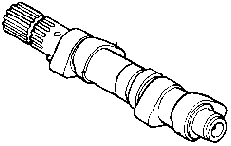
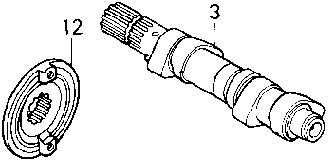
Note: Illustration on right hand side depicts a completely bare camshaft.  At this stage the cam will still have the autodecompressor assembly and the Cam Sprocket Collar (Item 12 Top Diagram) on it.

STEP TWO:

Press off the Cam Sprocket Collar (Item 12).

Note:  For me this was the most frightening stage.  We had my camshaft in a press capable of huge amounts of pressure and I was quite frightened it was going to bend or snap before it pressed off.  This fear was quite unfounded however.  BUT extreme caution MUST be taken, if you are not confident in doing this get an experienced machine shop to do it for you.

STEP THREE:

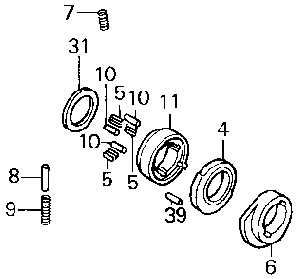
Remove Auto Decomp and Kickback Assembly.

Parts: 4, 5 (x3), 6, 7, 10 (x3), 11, 31, 39

Also Parts 8 & 9 which are located in the cylinder head beneath where the camshaft sits.

STEP FOUR:

Now that you have a completely bare cam it is time to weld or fill the now exposed auto decomp oil feed.  This hole is easily identified as it's the only one that goes right through into the centre of the camshaft in the area shown (diagram on right). 

WHY?

The more oil going to the rockers the better the life of the cam & rockers , if you don't block it off some of the oil will take the path off least resistance, which will be straight back down the cam chain opening to the sump  much better to lube the rockers first then to the sump. 

HOW?

Method 1 - When I removed the auto decomp. on my '88 XR600 I had a precision fit plug made.  Which was pressed in also with a loctite product that presently eludes me.

Method 2 - Have the hole professionally welded by the best welder available!! (TIG would probably be best), this should only be done by a very experienced welder as any heat or erosive spark damage and your cam could end up being scrap.  It is very important that none of the critical surfaces be a current path!

Method 3 - I have also heard of a sleeve being made up to cover it.  This is my current preferred method,  I recently had a sleeve mad for a genuine HRC cam that I have removed the auto-decomp setup from.  It would require a sleeve to be turned up with a tight fit.  This would probably be the most failsafe method, You need to remove, or grind away the small lug that is located in the same area as the oil hole as depicted.  You can also slot the sleeve (refer to Thorstens pic below) so as to not have to irreversibly modify the camshaft.

STEP FIVE:

Reassembly.

Press collar back on (reverse of STEP 2).

Reinstall Camshaft in motor as per Shop Manual.

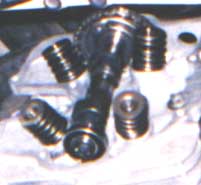
Note:  The picture shows cam replaced and timed up in the head of my since sold '88 XR600.


Pictured to the right here is the camshaft assembly before removal of the auto decompression mechanism.
camshaft assembly before modification
Picture by Thorsten Schmidt
Pictured to the Right here is the camshaft after the flange has been pressed off and it has been completely disasembled.  All parts with the obivous exception of the cam (part 3), collar (part 12), and the washer (part 31) are discarded.  Refer to diagram at the very top of the page if you are unsure which parts these are.
camshaft disasembled
Picture by Thorsten Schmidt
Pictured to the right here is the camshaft after this modification has been done using the sleeve method (method 3).  In this case instead of grinding the lug a slot was made in the sleeve instead.
Note:  Do not forget to remove the plunger and plunger spring ( parts 8 & 9 ) from the head before the installing the camshaft.  As it is no longer required and could cause engine damage is it is left in.
cam after modification
Picture by Thorsten Schmidt


Why remove the Auto Decomp?

There have been a number of reasons for this modification put forward.  Here are a few of them

  1. Provides a definitive TDC, which can aid in easy quick starting.
  2. Enables compression testing as RH exhaust valve is no longer held open.
  3. They are a mechanism known to fail over time and removing it eliminates any problems relating to failure.
  4. Less stalling low in the rev range
  5. More consistant easy starting if done correctly.
  6. A reduction in reciprocating weight in the valvetrain.
Are there any drawbacks?  The primary difference is that you must follow a more strict starting procedure.  Using throttle while starting can cause the bike to kick back.
  1. It makes the bike physically harder to kick over
  2. It removes the anti-kickback.

To be added at a later date:

- How does the Auto Decomp Work?
- Starting Procedure without Auto Decomp.

Note:  Thanks go out to: Revs, Alec, and Thorsten Schmidt for contibutions to this article.